If you’ve ever used ChatGPT and thought, “Wow, I wish my app could do this”, you’re in luck.
OpenAI allows you to plug that power right into your own software. The OpenAI API unlocks a new level of intelligence you can bring directly into your workflows, tools, and customer experiences. You can automate tasks, generate content, process audio or images, and even build smart assistants, all using simple API calls.
And here’s why this matters: the same technology behind the API is what’s powering ChatGPT, which hit over 400 million weekly active users in February, according to OpenAI. That’s not just impressive reach. It’s proof that people are actively engaging with AI at scale. When you build with the API, you’re building on top of something that’s already proven, trusted, and battle-tested.
Whether you’re a founder building your first prototype or an enterprise team optimizing a core product, the API gives you a platform for experimentation, automation, and scale.
And the truth is: it’s more accessible than you think.
In 2025, AI is no longer confined to research labs or exclusive platforms. It’s everywhere, and it’s radically shifting how we think about building, innovating, and creating.
But you might ask yourself: How do I connect to the API? How do I set up my environment? How do I make that first API call?
In this article, we’ll answer these questions and walk you through everything you need to know about the OpenAI API, step-by-step, and why it’s a game-changer for your product.
What Is the OpenAI API?
At its core, the OpenAI API is a gateway to the intelligence behind OpenAI models. It gives you direct access to the world’s most powerful AI capabilities.
Instead of manually prompting ChatGPT, you can send requests to OpenAI’s models from your own app. These requests can generate text, analyze sentiment, summarize documents, generate images, run logic, or even power autonomous agents.
The API turns AI into a utility: you feed it inputs (like a question or a document), and it returns outputs (like a response, image, or structured data), all inside your existing systems.
If the OpenAI API didn’t exist, businesses would have no real way to integrate AI into their products or workflows. You’d be limited to using ChatGPT manually, typing prompts into a browser, copying the responses, and pasting them somewhere else.
That might be fine for individuals, but it completely breaks at scale. You couldn’t automate tasks, personalize user experiences in real time, or build AI into customer-facing features. You couldn’t create AI-powered chatbots, recommendation engines, or internal tools that respond intelligently to users or data.
In that world, AI would remain a productivity tool, not a core part of your product.
The API is what turns AI from a cool demo into real infrastructure. Without it, innovation slows down, and only big companies with deep AI research teams could compete.
Also Read: How to Use OpenAI’s AI Agent Tools for Building AI Agents in 2025
Let’s say you run a SaaS company with thousands of daily support tickets.
With the API, you can plug OpenAI directly into your support system. The model can read incoming tickets, generate smart replies in seconds, and even flag complex issues for a human, automatically. Your support team becomes faster, more consistent, and more scalable.
Without the API, none of that is possible. You’re left with a powerful tool you can’t actually integrate. The only way to use AI would be to manually copy each ticket into ChatGPT, ask it to draft a response, then copy that reply back into your helpdesk. It’s slow, manual, and completely unsustainable as you grow.
The good news is that OpenAI provides API access to a range of models, each designed for specific tasks and use cases. Here’s an overview of the latest models:
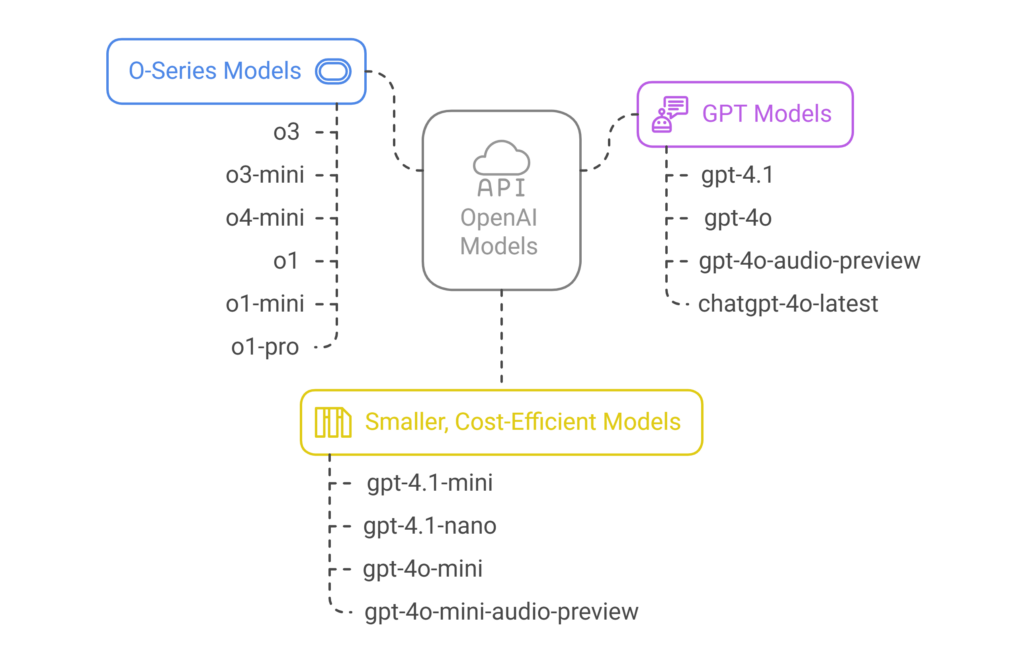
O-Series Models
O-series models excel at complex, multi-step tasks requiring sophisticated reasoning capabilities.
- o3: Released on April 16, 2025, o3 is OpenAI’s most powerful reasoning model, designed for complex problem-solving and deep analytical tasks.
- o3-mini: Released on January 31, 2025, o3-mini is a smaller, more efficient alternative to o3 that balances reasoning capabilities with speed and cost.
- o4-mini: Released on April 16, 2025, o4-mini is a faster, more affordable reasoning model in the o4 series, offering improved performance over o3-mini.
- o1: Released on December 5, 2024, o1 is the previous full o-series reasoning model, still available for backward compatibility.
- o1-mini: Released on December 5, 2024, o1-mini is a small model alternative to o1, optimized for speed and lower compute requirements.
- o1-pro: Released in March 2025, o1-pro is an enhanced version of o1 with additional compute resources for better response quality.
GPT Models
OpenAI’s versatile, high-intelligence flagship models are suited for a wide range of applications.
- gpt-4.1: Released on April 14, 2025, gpt-4.1 is OpenAI’s flagship GPT model optimized for complex tasks requiring advanced reasoning and generation capabilities.
- gpt-4o: Released on May 13, 2024, gpt-4o is a fast, intelligent, and flexible GPT model designed for versatile applications with improved response times.
- gpt-4o-audio-preview: Released on February 5, 2025, gpt-4o-audio-preview is a GPT-4o variant capable of processing audio inputs and generating audio outputs.
- chatgpt-4o-latest: Released on March 26, 2025, chatgpt-4o-latest is the GPT-4o model used in the ChatGPT interface, optimized for conversational interactions.
Smaller, Cost-Efficient Models
These models are optimized for speed and lower costs while maintaining strong capabilities.
- gpt-4.1-mini: Released on April 14, 2025, gpt-4.1-mini is balanced for intelligence, speed, and cost. This is an excellent middle-ground option in the GPT-4.1 series.
- gpt-4.1-nano: Released on April 14, 2025, gpt-4.1-nano is the fastest, most cost-effective GPT-4.1 model, ideal for high-volume applications with budget constraints.
- gpt-4o-mini: Released on July 18, 2024, gpt-4o-mini is a fast, affordable small model optimized for focused tasks where full GPT-4o capabilities aren’t required.
- gpt-4o-mini-audio-preview: Released on February 5, 2025, gpt-4o-mini-audio-preview is a smaller model capable of audio inputs and outputs with reduced compute requirements.
What You Can Build with the OpenAI API
The question isn’t just what you can do with the OpenAI API. It’s what you want to do with it. Because the possibilities are nearly limitless.
Let’s break it down:
1. Text Generation
- General Text Generation: The API can generate human-like text in response to a wide variety of prompts. Whether you’re creating content, drafting emails, or writing stories, the API can produce coherent, contextually relevant text based on the input you provide.
2. Text Completion
- Autocompletion: The API can complete partial sentences, paragraphs, or entire documents. It’s great for applications that require real-time assistance like text editing, drafting, or enhancing written content.
3. Summarization
- Abstractive Summarization: The API can take long pieces of text and condense them into shorter summaries, retaining the key points and meaning. This is ideal for summarizing articles, meeting notes, or research papers.
- Extractive Summarization: In addition to generating summaries, the API can also extract key phrases and important sentences from a body of text.
4. Translation
- Language Translation: The OpenAI API supports multilingual capabilities, allowing for real-time text translation across multiple languages. It ensures context and tone are preserved in the translation, enabling effective communication across linguistic barriers.
5. Sentiment Analysis
- Sentiment Detection: The API can assess the sentiment of a text, classifying it as positive, negative, or neutral. This is useful for analyzing customer feedback, social media posts, or any content that needs a sentiment evaluation.
6. Text Classification
- Topic Classification: The API can automatically categorize text into predefined categories. It can identify and classify documents by subject matter, making it useful for organizing large datasets of content.
- Custom Classifiers: You can create custom text classifiers tailored to your specific needs, like categorizing support tickets or user-generated content.
- Embeddings: Embeddings are used to represent text in a vector format, which enhances text classification by improving how the model understands and categorizes the input. This also supports more accurate, context-aware search and information retrieval.
7. Named Entity Recognition (NER)
- Entity Extraction: The API can identify and extract named entities from text, like the names of people, locations, organizations, dates, and other key entities. This functionality is valuable for structuring unstructured text into actionable data.
8. Question Answering
- Context-Based Question Answering: You can provide the API with a block of text (like a document or article), and it will extract relevant answers to specific questions from that text. This feature is ideal for building FAQ systems, knowledge bases, or intelligent search engines.
9. Conversation & Dialogue Systems
- Conversational Agents: The API can maintain context over multiple exchanges, allowing you to build sophisticated chatbots or virtual assistants. It supports multi-turn conversations, providing answers that align with previous interactions.
- Real-Time Dialogue: It can simulate real-time conversations, making it useful for applications requiring dynamic, context-aware interactions like customer support or interactive virtual assistants.
10. Text-to-Speech (TTS) Integration
- Speech Synthesis: Although not natively built for TTS, the API’s text generation capabilities can be paired with speech synthesis tools to convert generated text into spoken language, enabling the development of interactive voice applications or virtual assistants.
- Speech Recognition: While the OpenAI API does not directly provide speech recognition, it can be paired with third-party solutions to build complete voice-based systems that recognize spoken language and respond with generated text.
11. Code Generation & Code Assistance
- Code Generation: The OpenAI API can generate code snippets based on natural language descriptions. It can help automate code creation for common tasks, generate functions, or even write scripts for specific problems.
- Code Completion: The API can complete code that’s partially written, helping to speed up development and reduce coding errors.
- Code Explanation: If you have complex code, the API can explain it in simpler terms, which is particularly useful for teaching or debugging.
- Function Calling: The API supports function calling, which allows for the automation of tasks and integration of specific actions within generated code, enhancing the capabilities of developers working with the API.
12. Data Extraction & Parsing
- Data Parsing: The API can extract structured information from unstructured text, like pulling data points from reports or documents. This is helpful for data mining, report generation, and creating structured data from raw input.
13. Personalized Content Generation
- Customizing Tone and Style: You can influence the style and tone of generated text, like making it formal, casual, persuasive, or technical. This functionality helps to generate content that matches your brand voice or personal preferences.
- User-Centric Customization: It can tailor generated content based on user profiles, preferences, or behavior, making it useful for personalized marketing, content recommendations, or user communications.
- Fine-Tuning: You can fine-tune the model to better handle specific tasks or preferences, allowing it to generate even more personalized and relevant content based on your exact needs.
14. Text-Based Search & Information Retrieval
- Intelligent Search Systems: The API allows you to build advanced search engines that go beyond keyword matching, providing more accurate, context-aware search results.
- Contextual Information Retrieval: You can use the API to find specific information in large datasets of text, answering queries based on the underlying content.
- Embeddings: Embeddings enhance search functionality by transforming text into vectors, enabling more precise and context-sensitive searches.
15. Knowledge Integration & Reasoning
- Logical Reasoning: The API can make inferences based on the information it processes, applying logic and reasoning to respond to complex queries or tasks.
- Fact Extraction: It can extract factual data from documents, providing reliable answers even when the data is scattered across multiple sources.
16. Creativity & Idea Generation
- Creative Writing: The API can assist with writing stories, brainstorming ideas, and generating creative content like poems, songs, and dialogue.
- Innovation Support: For businesses and entrepreneurs, the API can assist in idea generation, help with brainstorming product names, marketing slogans, or even new business models.
17. Summarizing Conversations
- Conversation Summarization: The API can summarize the key points of a conversation or meeting, making it easier to review key takeaways and action items without manually sifting through transcripts.
18. Multimodal Capabilities (when integrated with images)
- Image and Text Integration: In combination with other OpenAI models, the API can handle multimodal tasks like interpreting text and images together. While this is more advanced, it opens the door to rich applications like analyzing image captions or generating text-based descriptions for images.
19. Text Manipulation
- Rephrasing & Paraphrasing: The API can rewrite or rephrase text to improve clarity, conciseness, or engagement, which is useful for editing content, rewriting for SEO, or adapting content for different audiences.
- Grammar and Spelling Checks: It can automatically correct grammatical errors, typos, and improve the overall quality of written text.
20. Contextual Suggestions & Recommendations
- Automated Recommendations: The API can generate suggestions based on text input, like recommending products, services, or content. It can be integrated into recommendation systems to help users find relevant items.
21. Moderation API
- Content Moderation: The Moderation API helps detect and filter out harmful, inappropriate, or offensive content. It can be used to ensure that generated text adheres to community guidelines and prevents harmful interactions in environments like social media, customer support, or chatbots.
Integration Tips for Your API Implementation
When you use OpenAI’s API, you’re basically having a conversation with ChatGPT. But instead of chatting on a website, you’re doing it through your own code.
Just like how you type a question into the ChatGPT website and get a reply, with the API, you write some code to send that question, and OpenAI sends you a reply back.
Here’s what you need to do for that to work:
- Pick which version of ChatGPT you want to talk to.
- Send a message, like: “What are some fun travel destinations?”
But instead of typing it in a chat window, you write that in code using something called the OpenAI Python library to connect your code with OpenAI.
Imagine it like this:
- Your user: “What is the return policy?”
- Your code sends that question to OpenAI’s API.
- The API processes the message and returns a response to your code: “The return policy allows for returns within 30 days of purchase with a receipt.”
- Your app displays the response back to the user.
This is exactly what the API does, just in code form.
But before jumping into code, it’s worth taking the time to experiment, optimize, and align your integration strategy with your application goals.
Here are 3 tips to help you get the most out of your OpenAI API implementation.
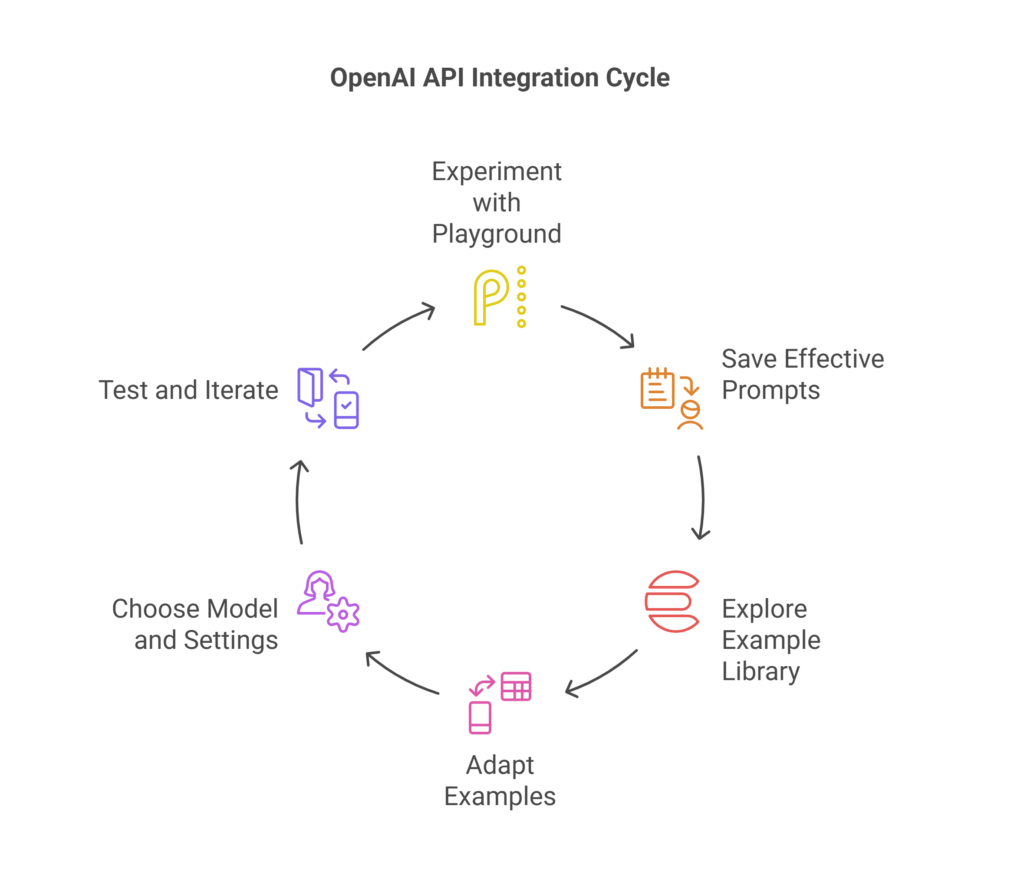
1. Start with the OpenAI Playground
Prompt engineering is a core part of API success. Strong prompts lead to better, more predictable outputs.
The Playground is the fastest way to understand how different prompt structures, model settings, and parameters affect output quality. Use it to test and iterate on prompts before you bake them into your application.
You can also explore other tools like the Assistants playground, fine-tuning UI, and file uploads, all of which can influence how your API integration performs in real-world scenarios.
Once you find prompts that consistently deliver good results, save them. These become the core of your API inputs, and integrating them properly will improve both reliability and user experience.
2. Browse the OpenAI Example Library
Don’t start from zero. OpenAI’s public library is full of pre-built examples across use cases like chatbots, document summarization, and classification.
Browse these resources to:
- Discover tested prompt structures and API call formats.
- Understand how to handle input/output parsing efficiently.
- See real-world use cases with code you can adapt immediately.
Whether you’re building a chatbot, summarizer, or data extractor, there’s likely an example close to what you need. Using the library as a springboard not only saves time, but it also helps you align with best practices from day one.
These demos offer prompt templates and working code that you can adapt quickly. It’s a great way to understand how others structure their API interactions and avoid common pitfalls.
3. Choose the Right Model and Settings for Your Needs
Your use case should guide your integration strategy. Ask yourself:
- How complex is the task?
- How fast does it need to run?
- What’s the budget?
Keep the following in mind:
- Match your use case: Consider complexity, response time, and budget constraints.
- Test multiple models: Experiment with GPT-3.5, GPT-4, or fine-tuned variants to find the right balance of performance and cost.
- Mind the parameters: Newer models may support different settings or respond differently to temperature, penalties, and tokens.
Cost Breakdown of the OpenAI API
Using the OpenAI API isn’t free, but it’s remarkably affordable for what you’re getting. You’re not paying for software. You’re tapping into intelligence. You’re renting the cognitive capacity of one of the most advanced language models in existence. That’s a fundamentally new idea.
Here’s how it works:
Pricing is usage-based. You pay per token, where tokens are chunks of words. 1,000 tokens equals 750-800 words. Think of it as bandwidth for intelligence. It’s about maximizing the value of each interaction, enabling transformative experiences at a fraction of the cost you might expect.
For most projects, this translates to a very low cost per interaction. Whether you’re integrating AI into a customer service chatbot, an intelligent content generator, or any other tool, the API gives you the power of next-gen AI without the overhead of building from scratch.
We’ve designed our solutions around this affordability. When we integrate OpenAI into your project, we ensure that you’re getting maximum value without blowing through your budget.
Also Read: ChatGPT for Business in 2025: Benefits, Examples, Best Practices
Understanding the exact cost structure of OpenAI’s API is crucial before going live with your implementation. Pricing varies a lot based on the model.
- o1-pro is the most expensive model by a wide margin. It’s explicitly described as OpenAI’s most expensive model ever.
- o3 is extremely powerful but also extremely costly to run at its highest performance settings, with compute costs per task in the thousands of dollars, making it impractical for most use cases.
- o1 is a previous-generation full O-series model, with costs around $5 per task, much less than o1-pro and o3, but still high compared to mini variants.
- o3-mini is a smaller, more efficient version of o3, with costs higher than the “mini” models of the previous generation.
- o1-mini is optimized for speed and low compute, costing just a few cents per task.
- o4-mini is specifically noted as the most affordable O-series model, optimized for high-throughput, high-volume, and cost-efficiency.
- O-Series models generally cost more due to their advanced reasoning capabilities.
- GPT flagship models (gpt-4.1, chatgpt-4o-latest) come next in cost. They are powerful but less costly than the top O-series.
- Mini and nano models are designed for cost-efficiency and speed, making them the cheapest options.
With a growing lineup of O-Series, GPT, and lightweight models, here’s how to think about your options.
Cost Multipliers & Performance vs Cost
Our team has created a detailed table with estimated relative cost multipliers, along with a brief note on their performance vs. cost trade-offs to help you understand which models offer the best balance for your needs.
Higher multipliers indicate proportionally higher cost per unit compute or token processed. These are approximate and relative, based on descriptions and typical usage costs.
| Model | Relative Cost Multiplier* | Performance vs Cost Notes |
| o1-pro | 100x | Top-tier quality and reasoning; extremely high cost, suitable only for critical, complex tasks. |
| o3 | 80x | Very powerful reasoning; slightly cheaper than o1-pro but still very expensive. |
| o1 | 20x | Strong reasoning capabilities; high cost but more accessible than o3 and o1-pro. |
| gpt-4.1 | 15x | Flagship GPT model with excellent reasoning and generation; high cost but versatile. |
| chatgpt-4o-latest | 12x | Optimized for chat; slightly cheaper than gpt-4.1 with good conversational performance. |
| gpt-4o | 10x | Fast and flexible; good balance of performance and cost. |
| o3-mini | 8x | Efficient version of o3; good reasoning at reduced cost, but still expensive relative to GPT minis. |
| gpt-4o-audio-preview | 7x | Adds audio I/O capabilities; slightly higher cost than gpt-4o-mini but good for multimodal tasks. |
| gpt-4o-mini-audio-preview | 4x | Audio-capable mini model; affordable with moderate performance. |
| gpt-4o-mini | 3x | Cost-effective for focused tasks; good speed and efficiency. |
| gpt-4.1-mini | 2.5x | Balanced model for cost, speed, and intelligence; great for many general applications. |
| o1-mini | 2x | Low compute requirements; good for fast, less complex reasoning at low cost. |
| gpt-4.1-nano | 1x | Fastest and cheapest GPT-4.1 variant; ideal for high-volume, budget-sensitive use cases. |
| o4-mini | 0.8x | Most affordable O-series model; best cost-efficiency for reasoning tasks in the O-series. |
Performance vs Cost Highlights
- o1-pro and o3: Best for ultra-complex, multi-step reasoning where cost is less of a concern than accuracy and depth.
- o1 and gpt-4.1: High performance, suitable for demanding tasks with a more reasonable budget.
- GPT-4o and chatgpt-4o-latest: Great for conversational AI and versatile applications with good speed and cost balance.
- Mini and nano models: Excellent for scaling, batch processing, and applications where cost efficiency is critical.
- o4-mini: Surprisingly affordable for an O-series model, offering a sweet spot for cost-conscious reasoning tasks.
How to Get Started with the OpenAI API
There’s a moment in every business leader’s journey when they realize they’re not just building apps, they’re shaping the future. If you’re reading this, that moment might be now.
At Bitcot, we help businesses integrate powerful AI tools like OpenAI seamlessly into their workflows.
But if you’re the hands-on type or just exploring what’s possible, here’s a quick guide where we take you step-by-step through the process of using the OpenAI API and its key component: the API key.
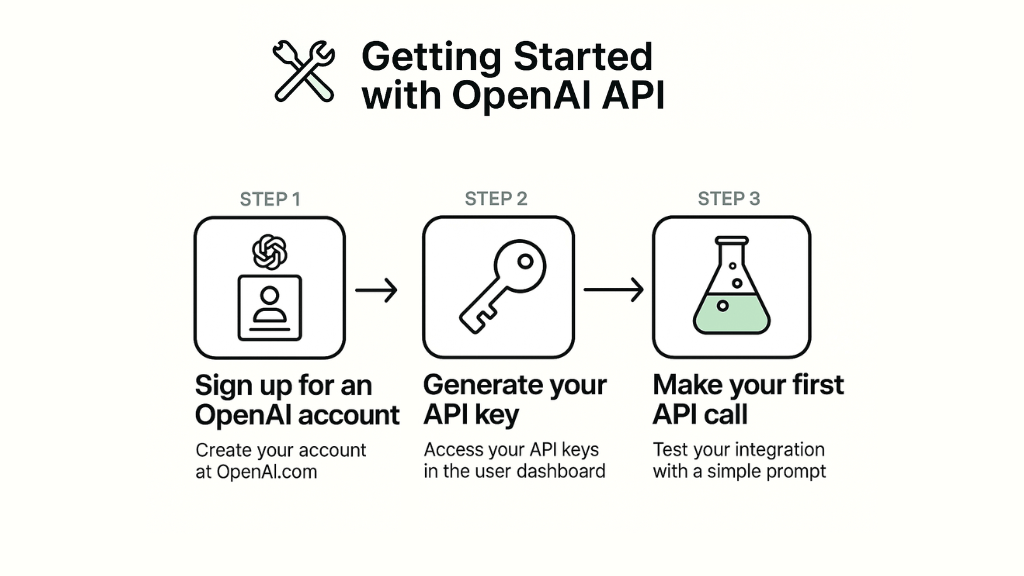
Getting started with the OpenAI API is easy and intuitive. Just follow these steps:
Step 1: Create an OpenAI Account
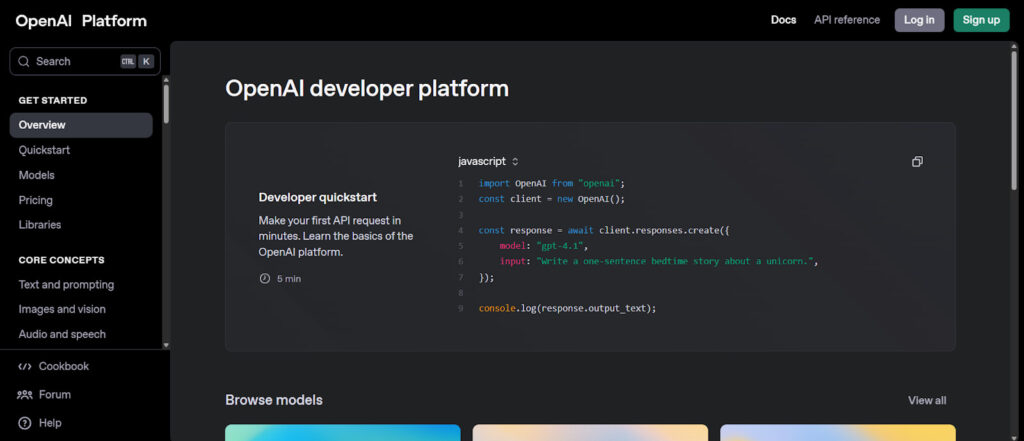
Head to platform.openai.com and sign up. If you’ve used ChatGPT before, you’re already halfway there. If not, this is the entry point to an ecosystem that will change how software gets built.
Step 2: Get Your API Key
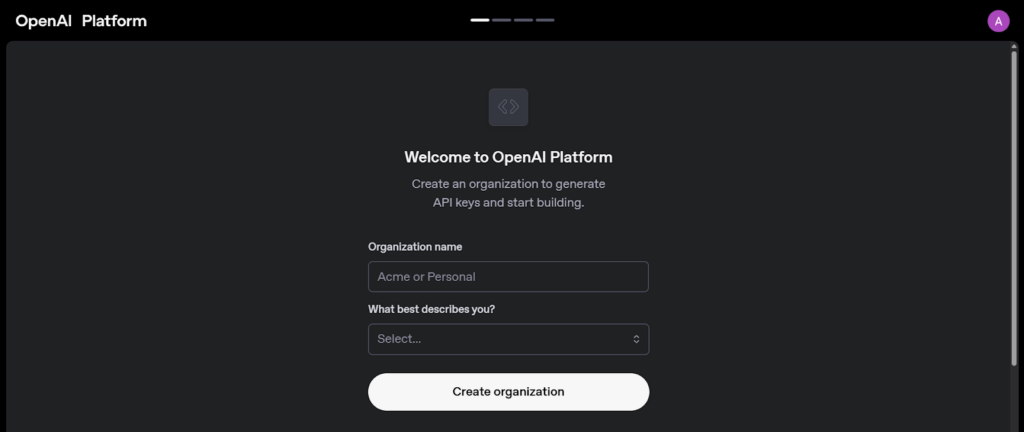
Once logged in, click “Start building” (top right button) to create an organization, which is required in order to generate API keys and start building with OpenAI’s tools.
Enter your organization name, select your role from the dropdown, and click “Create organization”.
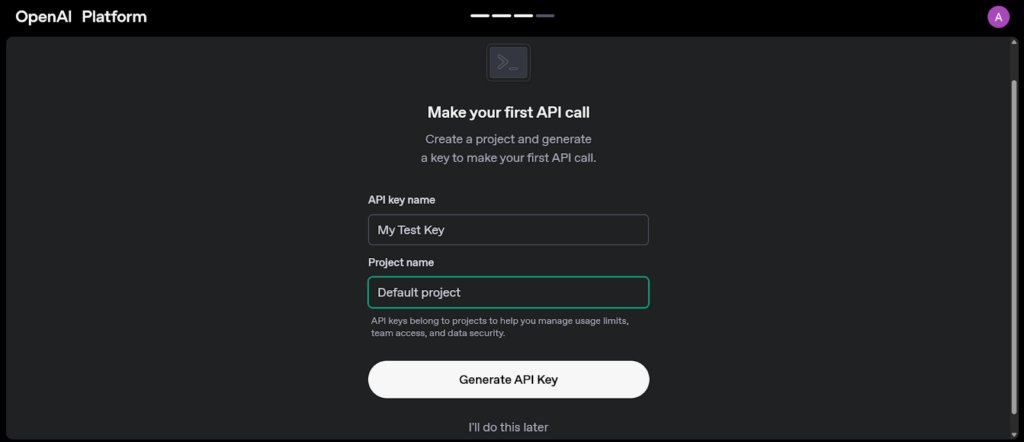
Next, follow the 4-step progress indicator to completion, where you’ll generate your first API key on the OpenAI platform.
- API Key Name: You can name the key anything.
- Project Name: This is the project the key will be linked to.
- After filling both, click “Generate API Key”. This will create a key you can use to make API calls.
This is the key you’ll use in your code to interact with OpenAI’s models.
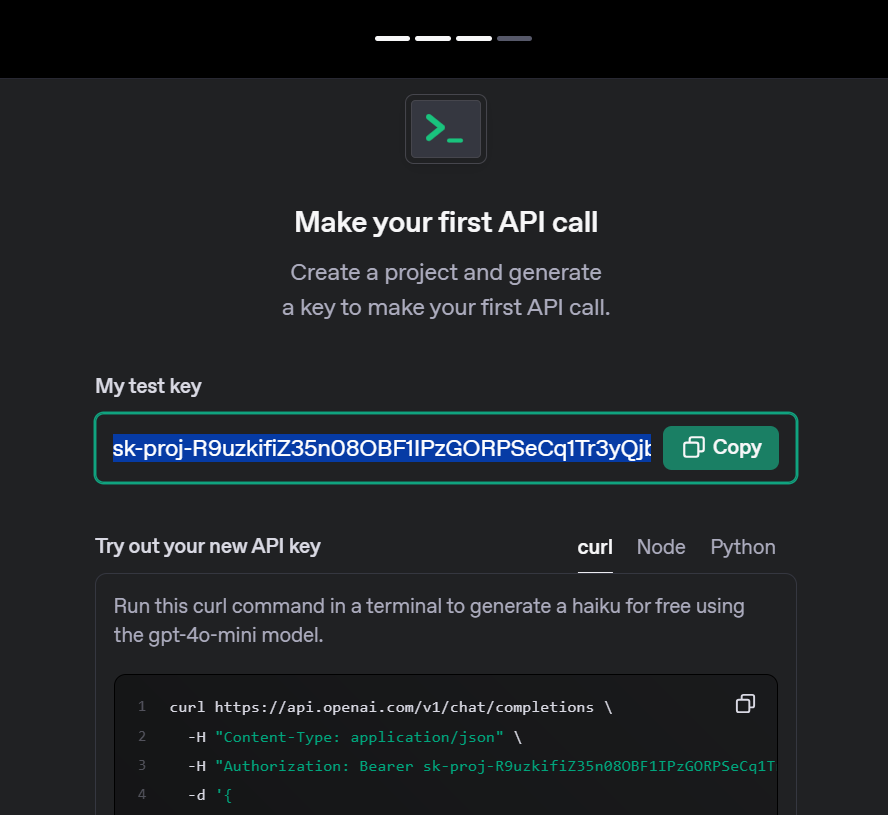
On the next screen, you can see that you’ve successfully created a test API key and are now ready to make your first API call using the OpenAI platform. Be sure to copy and store this key securely.
Step 3: Purchase Credits
Before you can make your first API call using this key, you’ll need to add a payment method and purchase API credits. OpenAI no longer provides free trial credits by default, so your account must have a positive credit balance to use the API. These credits are used every time you make an API call.
If you attempt to run the sample code without credits, your request will not be processed.
Clicking the ‘Continue’ button will prompt you to add API credits.
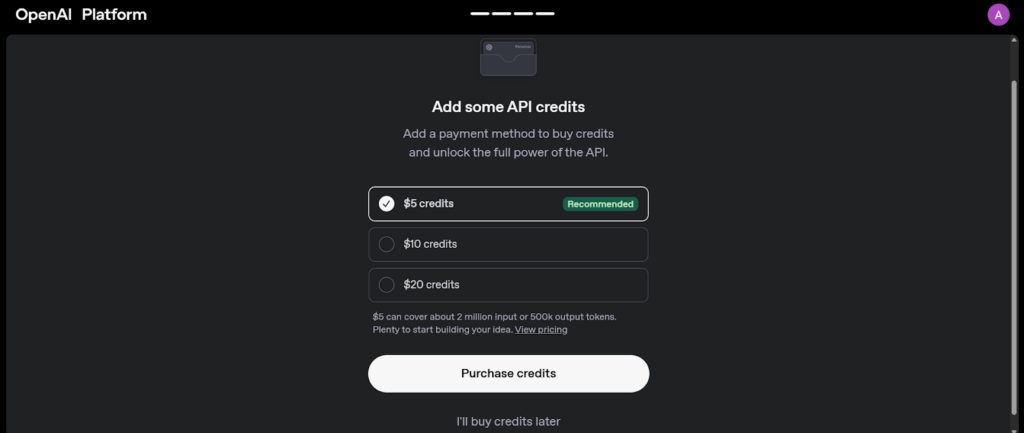
Click “Purchase credits” to pay.
Or, if you’re not ready yet, click “I’ll buy credits later” to skip.
Step 4: Use It in Your Code
Once you’ve added credits, head to Dashboard > API keys. The previously generated key should now be shown.
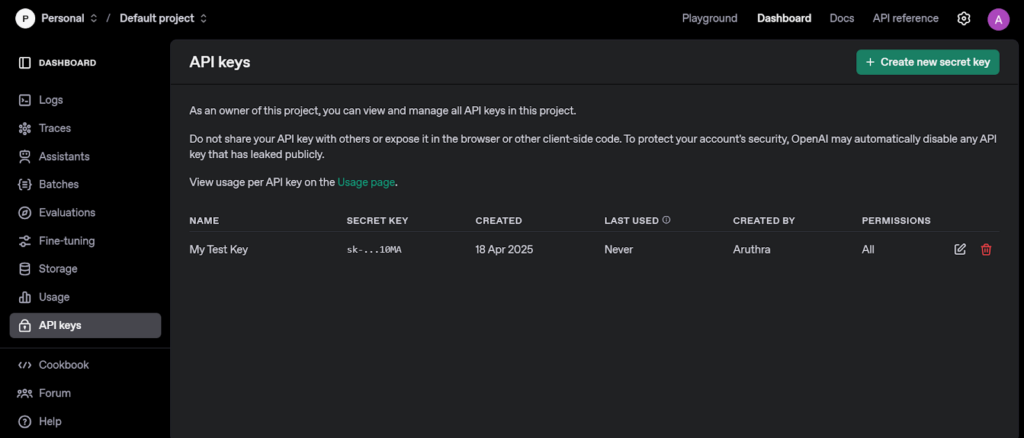
With your API key ready, you can start making API calls right away.
To interact with OpenAI’s API, you’ll need to write code that sends requests to the OpenAI server and processes the results.
OpenAI supports multiple programming languages, but Python is the easiest place to begin.
If you don’t have Python installed, go to python.org and download the latest version (Python 3.7+). Once Python is installed, you need to install the OpenAI Python package. This package allows your Python code to interact with OpenAI’s API.
To install it, open your command line and run the following command:
pip install openai
This will download and install the OpenAI library.
Now that you have the OpenAI package installed, you need to write some Python code to interact with OpenAI’s API.
Open your favorite code editor (e.g., VSCode, Sublime Text, or even Notepad), and create a new file called app.py. This will be your Python script.
In the first lines of your file, you need to import the OpenAI library and tell it your API key (which you created earlier). This allows your code to interact with OpenAI’s services.
Now that you’ve set up the library and your API key, it’s time to write the code that actually sends a request to OpenAI.
In your code, you will create a request to OpenAI’s API asking it to generate text based on a prompt you give it. For example, you could ask OpenAI to write a short story or answer a question.
Once you’ve written your code, it’s time to run it and see what OpenAI responds with.
Open your terminal and use the cd command to navigate to the folder where you saved app.py. For example:
cd path/to/your/folder
Run your script by typing the following command:
python app.py
If everything is set up correctly, you’ll see OpenAI’s response in the terminal.
You’ve now written Python code to interact with OpenAI’s API, made a request to generate text, and successfully run your script to get a response! From here, you can experiment with different prompts, use other OpenAI models (like DALL·E for image generation), and start building your own applications powered by AI.
Since OpenAI charges for API usage based on credits, remember to keep track of how much you’ve used. You can do this through the OpenAI Dashboard.
Final Thoughts
You’ve got the tool, and now it’s time to start innovating with it.
The ability to integrate advanced AI models into your own applications opens up a world of possibilities, whether you’re building an intelligent chatbot, analyzing data, or automating tasks.
Don’t overthink it. This is about taking that first step. Once you’re in, you’ll realize that the world of AI is wide open to you.
At Bitcot, we can help you get from zero to your first successful API call, and from there, to whatever you can imagine. Let’s make it happen.
Get in touch with our team to explore how we can incorporate AI into your product efficiently.